Welcome to Trello! Trello’s flexible, simple design lets you and your team organize and collaborate on everything, from your next family vacation to the day-to-day operations of your business. This tool is an all-around great fit for most projects, as long as your needs are not financial because Trello doesn’t come with any budgeting or invoicing features, otherwise Trello can handle it. Get your remote work team on track using Trello by using this guide to help you set up and master Trello today.
Getting Started with Trello
Getting set up and running with a new application is no easy task, I’ll guide you through Trello onboarding with simplicity and speed in mind. You’ll have your co-workers collaborating in Trello in no time!
How to Create a Board in Trello
Nothing happens in Trello unless it’s on a board. To get started, you’ll need to make one. Open Trello in your browser, and log in with your Google account or create a new account.
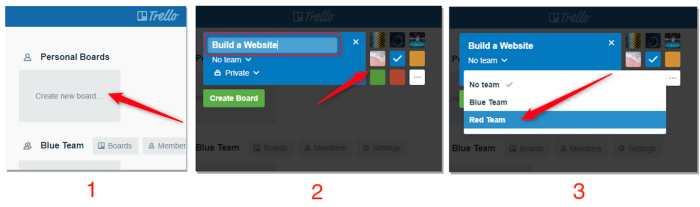
Follow these few steps to create a board:
- Under Personal Boards, click the box : Create new board…
- Give the board a title! You can also choose a colour of a background or pattern here, which you can change later.
- If you have multiple teams, Select which team you want to give access to the board.
Your first board will now show up on your Trello home page alongside any others you may have. If you’re part of multiple teams on the same account, they’ll be sorted by teams.
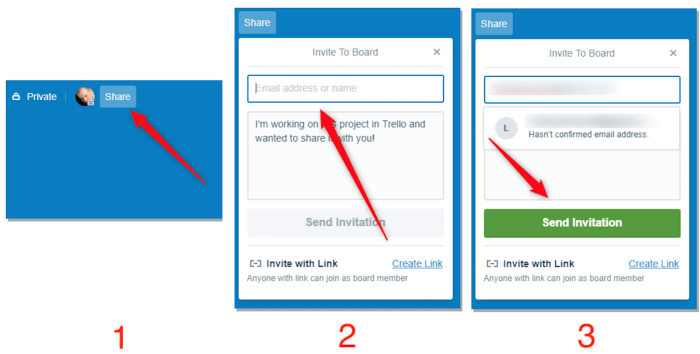
You can add members to your board one at a time:
- From your Trello home page, open the board. Click the Share button along the top of the board on the left side of the page.
- Find users by entering their emails or Trello username. You can also create a shareable link to send to someone if you don’t know either of those pieces of information.
- Once you’ve entered all the names of members you want to add, click Send Invitation.
With members on your board, you’ll be able to assign tasks and have conversations in the comment threads of cards!
Create Lists in Trello
Now that you’ve got your boards set up and team members added on Trello, you’ll need to start organizing tasks. Lists give you a lot of flexibility to organize them! For example, you might have three lists: To Do, Done and In Progress. Or, you could have a list for each member of your team to see which tasks each person has on their plate. Creating a list is simple:
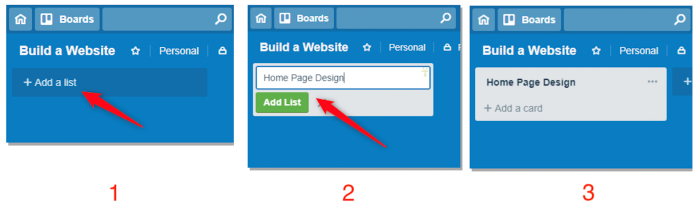
- First, open the board where you want to create a new list. To the right of your lists (or under the name of the board if you have no lists yet), click Add a list.
- Give your list a name, and click Add List when you do so.
- You’ll now have a button to add cards at the bottom of your lists.
How to Create Cards in Trello
Next, you’ll need to add some cards to your list to continue your work on Trello. You have a lot of options on cards, so we are just going to cover some basics.
- At the bottom of your list, click Add a card.
- Enter a title for the card.
- Click Add Card.
You can also add a checklist, labels, and attachments from your screen. It’s worth exploring what cards can do when organizing the tasks for your projects.
How to Assign Cards in Trello and Give Them Due Dates
Trello cards come with a lot of features, but two of the most useful are adding due dates and members. If you’re working with a team, you will want to know who’s working on a task or make sure the relevant people are informed of updates. Even if you use Trello on your own, due dates can help you keep track of when things need to be done.
Trello doesn’t use assignments in the traditional sense, but you can add one or more users—referred to as members—to a given card. If you only assign one person to a card, this is a useful shorthand for who a task has been assigned to, this only works if you stick to one member per card. You can add multiple members to a card so that everyone gets updates on a unique task. Every person added to a card will get notification when someone comments on a card etc.

To add someone to a card, follow these steps:
- Click on the card you want to assign users to.
- Click the Members button on the right side of the card.
- Search for users on your team, and click each one to add them.

You’ll be able to see the profile icon of anyone you’ve added to a card right in the list. Next, you’ll want to add due dates to keep everyone on track. Follow these steps to do so:
- Click on the card you want to add a due date to.
- On the right side of the card, click Due Date.
- Select a due date from the calendar tool, add a time, and click Save.
How to Add Labels to Cards in Trello
Grey cards on slightly darker grey lists can become something of a visual mess. But Trello lets you add colored labels to cards, which can help you identify what type of task a card is, or what group it belongs to, even when you move it from one list to another. You can give each label a color, a name, or both.
To add labels to a card, follow these steps:
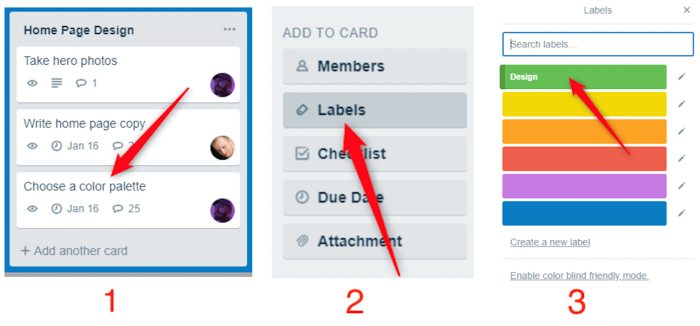
- Click on the card you want to add a label to.
- On the right-hand side, click Labels.
- Select a label from your list. This will include several pre-chosen colors. If you prefer, click the edit icon next to a label to add a title.
View Your Trello Tasks On a Calendar (Or Use Other Power-Ups)
By default, Trello doesn’t offer this feature, but you can add it with a Power-Up. The free version of Trello allows you to enable one Power-Up, and the calendar view is one of the more useful ones.
To enable the calendar Power-Up (or any other Power-Up), follow these steps:
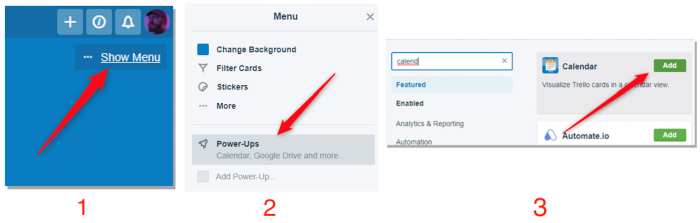
- On the far right side of the screen, under your profile icon, click Show Menu.
- Click Power-Ups.
- Search for Calendar and add the Calendar Power-Up from Trello.
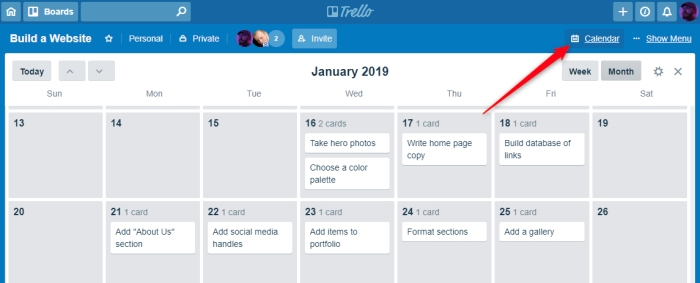
After this, you’ll see a new button along the top of your board, next to the Menu button, labelled Calendar. Click this button. Any cards you have with due dates attached will appear here!
Trello’s strength is in its flexibility. You can use it as a simple collection of to do lists, or an entire Kanban productivity system. Once you’ve mastered the basics, you’ll be able to bend it to whatever system works best for you. Subscribe to read more about business, sales and investing. Have a lovely day.